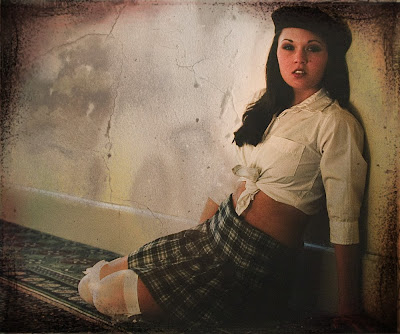
A texture is a photograph that consists entirely of structurally interwoven elements. For example a close up of a brick wall, or a close up of cracks in the sidewalk. Using Photoshop, a texture can be combined with another photograph to give it additional depth and richness.
There are dozens of free photographic textures available on the web. But, I find most of them aren't the best quality and many of them are too texture heavy.
Fortunately, it's very easy to build up a good library of textures fairly easy. All you need is your camera and a few hours to wonder around town looking for any texture that catches your eye. I've found the best places to find good, quality textures is on old structures that have been weathered extensively.
Look for old brick buildings, stucco walls, doors with peeling paint, etc. Once you find a texture you like, set up a tripod and shoot a series of bracketed exposures. I usually shoot +1/-1 EV. This will give you three exposures of each texture. When using textures, it is possible you may want to use an under- or over-exposed texture because it will give you a better blend when you apply the texture to a photo. When saving your textures into a library, I recommend keeping the image the same size and dpi as it was originally captured. That way, you can resize the textures as needed when using them in other projects.

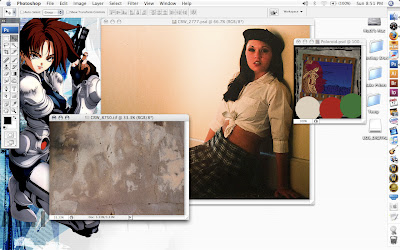
The screen shot above shows the original texture and photograph I used to make the image shown at the beginning of the tutorial. The texture photograph was made from a concrete covered brick wall in an ally behind The Grenville Advocate. I took the photograph of the model several years ago on Fuji Provia film at a photography seminar. I wanted my final image to have a film-grain feel to it, so I took a photograph of an 8"x10" print I had of the photo. Combining the texture and the image was a simple four-step process.
Step 1
Open your original image in Photoshop and use Image --> Image Size (Option-Command + I) to resize the canvas to your desired image size. Resize teh texture so that it is slightly larger than the image your working on.
Step 2
Select the entire canvas on the texture using Select --> All (Command +A) and Edit --> Copy (Command +C). Now, switch to your image and Edit --> Paste (Command + V) to paste the texture into a new layer. At this point, your texture will cover your image.

Step 3
Open the Layers Pallet (Window --> Layers or F7) and select the layer with your texture by clicking on it. At very top of the layers pallet, there is a pull down menu that is set to "Normal." This is the layer blending mode. Blending modes, simply, are methods of mixing layers without merging them. There are 24 different blending modes, but the primary modes you'll use are Multiply, Darken, Lighten, Screen, Overlay and Soft Light.
Switch between several of the blending modes until you find a blending effect that you like for your image. If you find the texture to be a little overpowering, you can reduce the opacity using the Opacity Slider the is to the right of the Blending Modes selection menu.
For my image, I used Darken mode and reduced the opacity to 69 percent.
Step 4
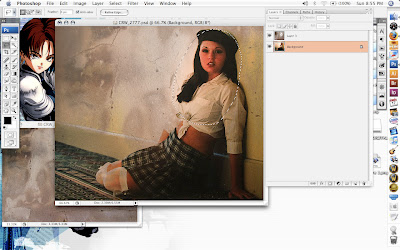
Now, you'll want to clean up your image. Most likely, you'll have some of the texture bleeding through on portions of the image you want to be seen more clearly. This is a simple matter of erasing portions of the texture so it doesn't affect the image below. Select the erasing tool and switch the mode to Brush from the pull down menu in the toolbar. Also in the toolbar, set the Flow to about 10 percent. For the brush, select a brush with a hardness of 0 so that you have really soft edges on the brush.
To finish things off, simply brush away the portions of the texture overlaying you image in an unappealing way. Since the Flow is set fairly low, you may have to make several passes to get the effect you want.
In my image, I erased portions of the texture shown by the marquee in the screenshot above. However, don't use the selection tool while you are erasing, it will give you hard lines where you erased. I just used it to show the area I erased the texture.
To complete the image I applied several more techniques I'll be writing tutorials on in the next three weeks.


No comments:
Post a Comment