Showing posts with label Photoshop. Show all posts

Sunday, January 4, 2009

Creating and Applying Photographic Textures


A texture is a photograph that consists entirely of structurally interwoven elements. For example a close up of a brick wall, or a close up of cracks in the sidewalk. Using Photoshop, a texture can be combined with another photograph to give it additional depth and richness.

There are dozens of free photographic textures available on the web. But, I find most of them aren't the best quality and many of them are too texture heavy.

Fortunately, it's very easy to build up a good library of textures fairly easy. All you need is your camera and a few hours to wonder around town looking for any texture that catches your eye. I've found the best places to find good, quality textures is on old structures that have been weathered extensively.

Look for old brick buildings, stucco walls, doors with peeling paint, etc. Once you find a texture you like, set up a tripod and shoot a series of bracketed exposures. I usually shoot +1/-1 EV. This will give you three exposures of each texture. When using textures, it is possible you may want to use an under- or over-exposed texture because it will give you a better blend when you apply the texture to a photo. When saving your textures into a library, I recommend keeping the image the same size and dpi as it was originally captured. That way, you can resize the textures as needed when using them in other projects.


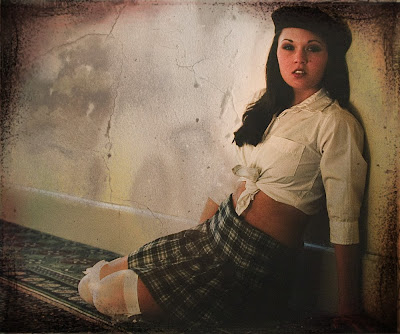
The screen shot above shows the original texture and photograph I used to make the image shown at the beginning of the tutorial. The texture photograph was made from a concrete covered brick wall in an ally behind The Grenville Advocate. I took the photograph of the model several years ago on Fuji Provia film at a photography seminar. I wanted my final image to have a film-grain feel to it, so I took a photograph of an 8"x10" print I had of the photo. Combining the texture and the image was a simple four-step process.

Step 1
Open your original image in Photoshop and use Image --> Image Size (Option-Command + I) to resize the canvas to your desired image size. Resize teh texture so that it is slightly larger than the image your working on.

Step 2
Select the entire canvas on the texture using Select --> All (Command +A) and Edit --> Copy (Command +C). Now, switch to your image and Edit --> Paste (Command + V) to paste the texture into a new layer. At this point, your texture will cover your image.


Step 3
Open the Layers Pallet (Window --> Layers or F7) and select the layer with your texture by clicking on it. At very top of the layers pallet, there is a pull down menu that is set to "Normal." This is the layer blending mode. Blending modes, simply, are methods of mixing layers without merging them. There are 24 different blending modes, but the primary modes you'll use are Multiply, Darken, Lighten, Screen, Overlay and Soft Light.

Switch between several of the blending modes until you find a blending effect that you like for your image. If you find the texture to be a little overpowering, you can reduce the opacity using the Opacity Slider the is to the right of the Blending Modes selection menu.

For my image, I used Darken mode and reduced the opacity to 69 percent.

Step 4
Now, you'll want to clean up your image. Most likely, you'll have some of the texture bleeding through on portions of the image you want to be seen more clearly. This is a simple matter of erasing portions of the texture so it doesn't affect the image below. Select the erasing tool and switch the mode to Brush from the pull down menu in the toolbar. Also in the toolbar, set the Flow to about 10 percent. For the brush, select a brush with a hardness of 0 so that you have really soft edges on the brush.

To finish things off, simply brush away the portions of the texture overlaying you image in an unappealing way. Since the Flow is set fairly low, you may have to make several passes to get the effect you want.

In my image, I erased portions of the texture shown by the marquee in the screenshot above. However, don't use the selection tool while you are erasing, it will give you hard lines where you erased. I just used it to show the area I erased the texture.

To complete the image I applied several more techniques I'll be writing tutorials on in the next three weeks.

Sunday, July 13, 2008

Coloring Line Art with Adjustment Layers


In this tutorial we’ll be using Adjustment Layers to color the line art. Adjustment layers are one of the most powerful, and probably least used, features of Photoshop. To create an adjustment layer, open your layers pallet and click on the half-black/half-white circle at the bottom of the pallet. In this tutorial we’ll only be using the first option, solid color (See the image below).


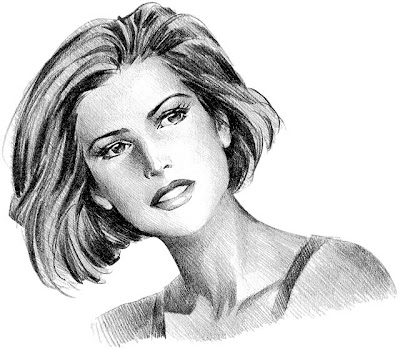
More on adjustment layers later. Open your line art in Photoshop. (The source image and a copy of the Illustrator Skin Tones Swatch are included at the end of the tutorial. If you wish to follow along with those images, scroll down and Right+Click on each image and select Save As). Make sure the image is in RGB mode (Image -> Mode -> RGB Color) before we begin.

The first thing we’re going to do is preserve the details of the lines in a separate layer using an alpha channel. To do this, select the background layer in the layers pallet. The Select All (Cmd+A) (Note: I’ll be using Mac shortcut commands in this tutorial. If you’re using a PC, use the Ctl key instead of the Cmd key). Then copy the selection using Cmd+C.

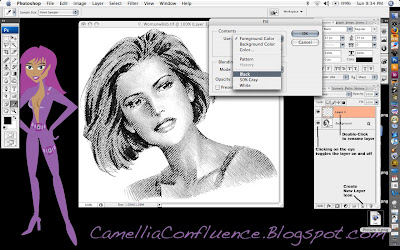
Now, Cmd+Click on the Alpha 1 channel icon and anything white will be selected. In order to be able to select the black lines, we need to invert the image, or flip-flop the colors. Use Cmd+D to drop the selection, then Select All, Cmd+A, and use the Image -> Image -> Adjsutments -> Invert (Cmd+I) and the image will be inverted. Cmd+Click on the layer again to select the white lines.


Now, switch back to the layers pallet and click on the background layer. In the layers pallet, create a new layer by clicking on the Create Layer icon at the bottom of the pallet. The new layer will be called Layer 1 by default. You can double-click on the layer name to rename it. I renamed my Layer “Solid Lines.”

Now select Edit -> Fill and choose Black from the pull-menu in the Contents portion of the dialogue.


You can click on the “Eye” icon on the background layer to turn it on and off in order to better see what the “Solid Lines” layer actually consists of.

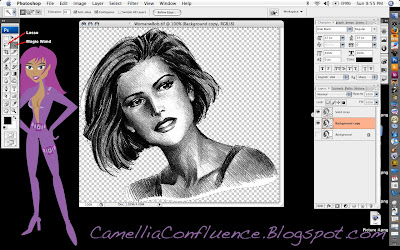
You can also use the “New Layer Icon” to duplicate an existing layer. For the next step, we need to duplicate the background layer. So Click+Drag the background layer onto the “New Layer Icon.” The layer created will be called “Background copy.” I left the name unchanged for the tutorial, because that’s what I would have called the layer anyway.

The final preparation step before painting is to remove the white background from the “Background copy” layer. Use the Magic Wand and Lasso selection tools for this step. Then delete the selected areas.


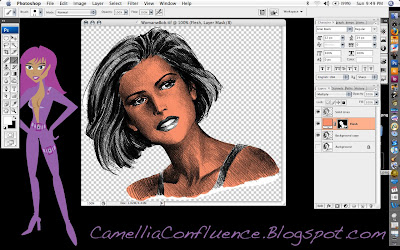
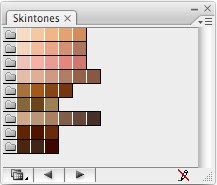
Now, we’ll start adding color one layer at a time. I always begin with the flesh layer. I have a screenshot of the Adobe Illustrator skin tones color swatches I keep hand. I used the eyedropper tool to sample one of the flesh tones.

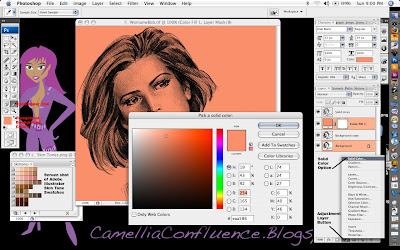
Once you have your color chosen, selected the adjustment layers icon (the half-black/half-white circle at the bottom of the layers pallet) and chose the Solid Color option (the first one) from the pop-up menu. By default, the color of the adjustment layer is the same as the foreground color. See the image below.


Solid color adjustment layers act like a mask. Any portion of the layer that is white appears as a solid color, Anything black is completely masked. Shades of gray allow a portion of the color to show through.

Now, if you notice in the screenshot above, the entire layer is flesh colored. That’s because the layer is filled with white. Now Select All (Cmd+A) and then Edit -> Fill and use Black.

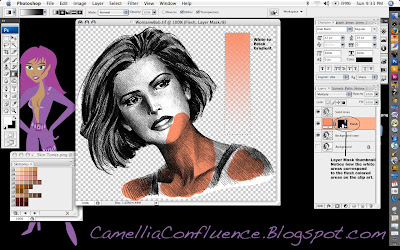
The adjustment layer now becomes completely transparent. In order to get the color to show through, we have to use the Paint Brush tool and paint in areas of white where the flesh is. In the image below, I’ve painted portions of the flesh and drawn a white to black gradient in a rectangular selection marquee. Look at the gradient and you’ll notice how shades of gray reveal increasingly transparent shades of the flesh color.

Remember though, we want the detail in the background image to show through as well. So change the Layer Mode to Multiply to reveal this detail.

Now, go ahead and paint in the entire flesh area. Use a larger brush size on large areas and decrease the brush size in areas where detail is critical, like around the eyes and lips.

Some things to know about adjustment layers:
1. If you paint into an area accidentally, switch the foreground color to black and paint over the mistake. The black paint will act like the eraser tool in a mask.
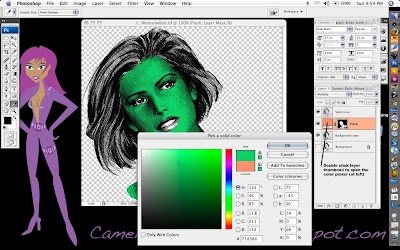
2. What if you don’t like the color you just painted in? No need to worry, this is one of the strengths of adjustment layers. Just double click on the layer thumbnail and a color picker will pop up. Select whatever color you want. You can change it as much as you want and it will not affect any other layer in the image. (See screenshot below.)


Now, keep adding Solid Color Adjustment Layers for each color you want to add to the line art.

Steps in making a new Solid Color Adjustment Layer:
1. Click on the Adjustment Layer Icon on the bottom of the Layers Pallet.
2. Select Solid Color option
3. Choose your color from the color picker
4. Rename the layer (I use Eyes, Lips, Hair, etc.)
5. Change the layer mode to Multiply
6. Fill the layer with black
7. Paint the areas you want to be in color with white using the Paint Brush Tool.

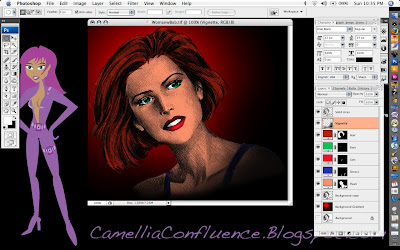
When you are finished, your colored line art will look similar to the one I did below.

To finish off the picture you may want to make some adjustments to the Solid Lines layer. In the image above, I changed the mode to Multiply and reduced the opacity to 67 percent so the solid lines weren’t so overpowering.

I used a red and black circular gradient to provide a simple background as well. To give the clip art a vignette look, I airbrushed the lower right corner in a very thin layer of black using a 300-pixel brush with 0 percent hardness and 30 percent flow. This is the Vignette layer just below the Solid Lines Layer in the screenshot.

You’ll also have some pesky white areas on the “Background copy” layer. I used the Brush Eraser tool with a 20-pixel radius and 0 percent hardness to carefully erase those areas.

Original Source File:


Adobe Illustrator Skintones Swatch:

Friday, February 15, 2008

Digital Post Processing: The Marina Effect


I was playing around with some post-processing ideas today based on a similar concept to the Orton Effect. The original technique was developed for positive film by Michael Orton. This link provides a good deal of information on the Orton Effect, its history with film and how to apply the technique in digital photography.


The second image is the original image I used while working on the effect. I took the photo of a model named Marina in 2001, hence the name for the technique. The first image is the result of this post-processing technique. The first picture links to the larger version of the image, which shows the facial detail much better. I have a side-by-side comparison of the before-and-after images on Fickr.

The Orton Effect creates a loss of detail in the darker areas of the image. I was looking for a way to achieve a similar effect, but without loss of detail in the shadows. I also wanted the finer details in the image to really stand out.

After a couple of hours of working through various ideas, I came up the the basis for the Marina Effect. It achieves an Ortonesque effect while keeping detail in the darker portions of the image and only slightly softens areas of the image I want to remain sharp, like the eyes.

I still have to do some more work on the effect so that it produces exactly what I have envisioned. Since I want to apply this style to a lot of my photography, I don't plan on discussing the post-processing in any detail at this time.


###

Photoshop my way

From time-to-time I'll be writing a few posts on Photoshop. Mostly, the posts will deal with post processing in Photoshop. I'll also be rewriting a lot of actions I wrote for Photoshop 5-7 so they work correctly in CS2 and 3. You can download the original actions from Adobe from my old account.

Tutorials
March 12, 2008: The Orton Effect
Sunday, July 13, 2008: Coloring Line Art


Development of My Own Digital Post Processing Techniques
Feb. 15, 2008: Digital Post Processing: The Marina Effect

Feb. 21, 2008: Digital Post Processing: Kasumi Effect Chaos
Feb. 25. 2008: Digital post Processing: Kasumi Effect, the Kokoro Enhancement


###