Thursday, July 31, 2008

Chelsea in Electric Blue


Life in general has been pretty busy the last couple of weeks. None-the-less, I managed to squeeze in some work in Illustrator. For some reason, I'm kind of hooked on the style of artwork Esurance uses in its commercials.

It took me about four hours to complete the wallpaper. I based the girl, I'm calling her Chelsea, off of a rough sketch in my sketchbook. I scanned it in, placed it in Illustrator and then used the pen tool to trace it. About half of the time it took to finish the piece was spent on the hair. I t took me a while to reach a result I was happy with.

I'm going to let the project rest for a few days and then take a look at again. I'd like to add some more highlights to give it an extra dimension. And I'll probably use Photoshop to do some more detailed shading on the face.

Sunday, July 13, 2008

Coloring Line Art with Adjustment Layers


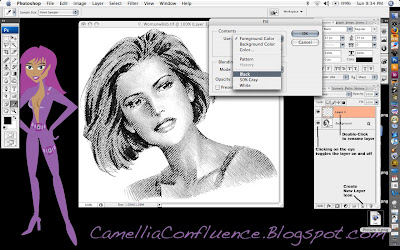
In this tutorial we’ll be using Adjustment Layers to color the line art. Adjustment layers are one of the most powerful, and probably least used, features of Photoshop. To create an adjustment layer, open your layers pallet and click on the half-black/half-white circle at the bottom of the pallet. In this tutorial we’ll only be using the first option, solid color (See the image below).


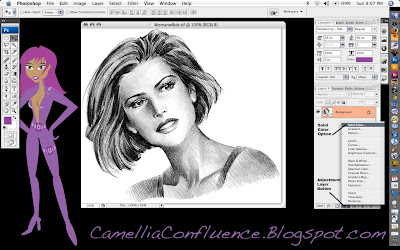
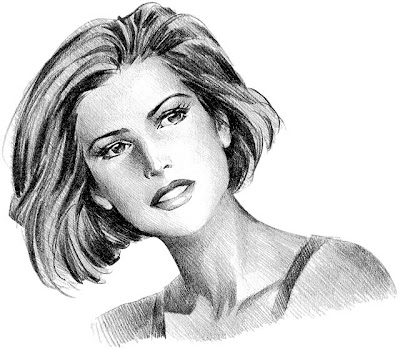
More on adjustment layers later. Open your line art in Photoshop. (The source image and a copy of the Illustrator Skin Tones Swatch are included at the end of the tutorial. If you wish to follow along with those images, scroll down and Right+Click on each image and select Save As). Make sure the image is in RGB mode (Image -> Mode -> RGB Color) before we begin.

The first thing we’re going to do is preserve the details of the lines in a separate layer using an alpha channel. To do this, select the background layer in the layers pallet. The Select All (Cmd+A) (Note: I’ll be using Mac shortcut commands in this tutorial. If you’re using a PC, use the Ctl key instead of the Cmd key). Then copy the selection using Cmd+C.

Now, Cmd+Click on the Alpha 1 channel icon and anything white will be selected. In order to be able to select the black lines, we need to invert the image, or flip-flop the colors. Use Cmd+D to drop the selection, then Select All, Cmd+A, and use the Image -> Image -> Adjsutments -> Invert (Cmd+I) and the image will be inverted. Cmd+Click on the layer again to select the white lines.


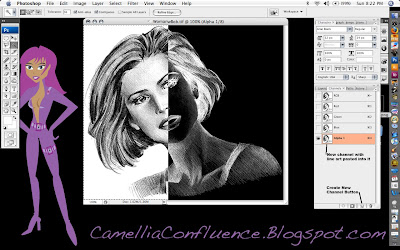
Now, switch back to the layers pallet and click on the background layer. In the layers pallet, create a new layer by clicking on the Create Layer icon at the bottom of the pallet. The new layer will be called Layer 1 by default. You can double-click on the layer name to rename it. I renamed my Layer “Solid Lines.”

Now select Edit -> Fill and choose Black from the pull-menu in the Contents portion of the dialogue.


You can click on the “Eye” icon on the background layer to turn it on and off in order to better see what the “Solid Lines” layer actually consists of.

You can also use the “New Layer Icon” to duplicate an existing layer. For the next step, we need to duplicate the background layer. So Click+Drag the background layer onto the “New Layer Icon.” The layer created will be called “Background copy.” I left the name unchanged for the tutorial, because that’s what I would have called the layer anyway.

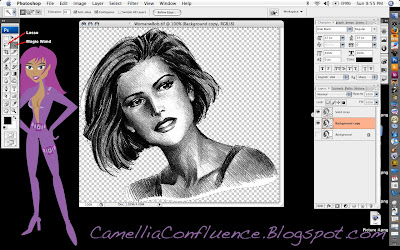
The final preparation step before painting is to remove the white background from the “Background copy” layer. Use the Magic Wand and Lasso selection tools for this step. Then delete the selected areas.


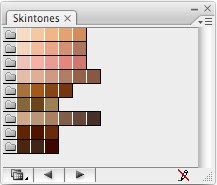
Now, we’ll start adding color one layer at a time. I always begin with the flesh layer. I have a screenshot of the Adobe Illustrator skin tones color swatches I keep hand. I used the eyedropper tool to sample one of the flesh tones.

Once you have your color chosen, selected the adjustment layers icon (the half-black/half-white circle at the bottom of the layers pallet) and chose the Solid Color option (the first one) from the pop-up menu. By default, the color of the adjustment layer is the same as the foreground color. See the image below.


Solid color adjustment layers act like a mask. Any portion of the layer that is white appears as a solid color, Anything black is completely masked. Shades of gray allow a portion of the color to show through.

Now, if you notice in the screenshot above, the entire layer is flesh colored. That’s because the layer is filled with white. Now Select All (Cmd+A) and then Edit -> Fill and use Black.

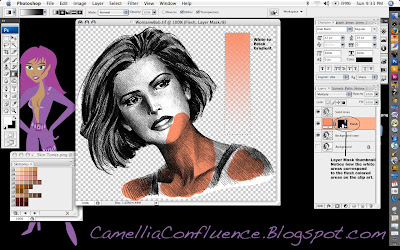
The adjustment layer now becomes completely transparent. In order to get the color to show through, we have to use the Paint Brush tool and paint in areas of white where the flesh is. In the image below, I’ve painted portions of the flesh and drawn a white to black gradient in a rectangular selection marquee. Look at the gradient and you’ll notice how shades of gray reveal increasingly transparent shades of the flesh color.

Remember though, we want the detail in the background image to show through as well. So change the Layer Mode to Multiply to reveal this detail.

Now, go ahead and paint in the entire flesh area. Use a larger brush size on large areas and decrease the brush size in areas where detail is critical, like around the eyes and lips.

Some things to know about adjustment layers:
1. If you paint into an area accidentally, switch the foreground color to black and paint over the mistake. The black paint will act like the eraser tool in a mask.
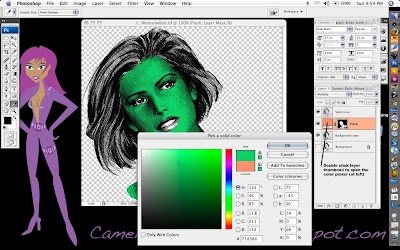
2. What if you don’t like the color you just painted in? No need to worry, this is one of the strengths of adjustment layers. Just double click on the layer thumbnail and a color picker will pop up. Select whatever color you want. You can change it as much as you want and it will not affect any other layer in the image. (See screenshot below.)


Now, keep adding Solid Color Adjustment Layers for each color you want to add to the line art.

Steps in making a new Solid Color Adjustment Layer:
1. Click on the Adjustment Layer Icon on the bottom of the Layers Pallet.
2. Select Solid Color option
3. Choose your color from the color picker
4. Rename the layer (I use Eyes, Lips, Hair, etc.)
5. Change the layer mode to Multiply
6. Fill the layer with black
7. Paint the areas you want to be in color with white using the Paint Brush Tool.

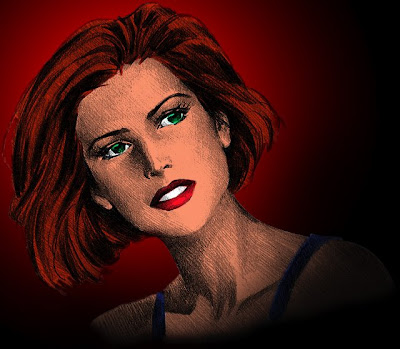
When you are finished, your colored line art will look similar to the one I did below.

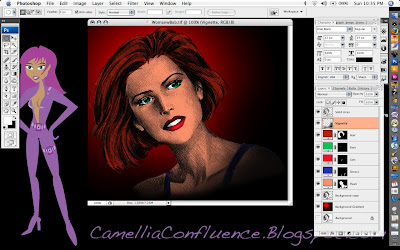
To finish off the picture you may want to make some adjustments to the Solid Lines layer. In the image above, I changed the mode to Multiply and reduced the opacity to 67 percent so the solid lines weren’t so overpowering.

I used a red and black circular gradient to provide a simple background as well. To give the clip art a vignette look, I airbrushed the lower right corner in a very thin layer of black using a 300-pixel brush with 0 percent hardness and 30 percent flow. This is the Vignette layer just below the Solid Lines Layer in the screenshot.

You’ll also have some pesky white areas on the “Background copy” layer. I used the Brush Eraser tool with a 20-pixel radius and 0 percent hardness to carefully erase those areas.

Original Source File:


Adobe Illustrator Skintones Swatch:

Friday, July 11, 2008

NFL Cheerleaders

NFL Cheerleaders. Enough said. I may eventually get around to doing all the teams, but it's not a real high priority. These are kind of boring to do. All of the costumes are basically very similar just the color schemes are different.


Thursday, July 10, 2008

Super Hero Girl - Stilletto


This is a cross between a Tandy Bowen's, from Cloak and Dagger, and Supergirl's Costumes with some black stockings, gloves and a few puffy arm and leg bands thrown into the mix.

One night "Superhero Girl" by Eve 6 played on iTunes and I thought, that'd be a cool costume, so I stopped whatever I was doing and skinned this in about an hour. I based the costume on what I remember Dagger's and Supergirl's costumes looked like when I was a kid and still had time and money to read comics.

Bah, I miss those days.

Nishi's Racing Modelwear 001


I made these outfits based on Race Queens in Asia. Race Queens are pretty much banned from tracks in America because of the highly suggestive costumes and for safety reasons. However, In Japan, most Race Queens are pop idols and almost as an important part of the race team as the driver. They act as promotional models and can draw huge crowds to promotional events, such as car shows. It is ironic that an American Company, Hawaiian Tropic, started the Race Queen craze in 1983 at 24 Hours of Le Mans.

The practice of using promotional models at car shows is prevelent in the United States. These models are usually associated with the street racing or import scene. For example, Import Tuner Magazine keeps a running list of the models that pose with cars for their stories.

Andrea Bagnall (photo) seems to be my favorite domestic car show model.

Back to the SL portion of the post, for some reason people really seemed to like these outfits. I had several people want copies of the outfit in custom colors. Six color variations are shown below, but I probably did about 10 different colors.

I did two a Tony Stewart and two other Nishi Racing outfits. I don't seem to have any screen shots of those costumes though. My wireless router is being quirky, so Second Life keeps booting me because of timed out connections. When I get that fixed I'll log on and take some screens of those.

Naughty Nurse


Every self-respecting female avatar needs a naughty nurse outfit. Hmm. I need to get around to doing a French Maid outfit one day.

Modern Witch


This is probably my favorite costume. I wanted a new outfit for Halloween 2007, I decided on a witch costume. I didn't really have a concept for the clothing, I just wanted it to look sexy. So, I just sat down with Photoshop one night and banged out the textures.

I decided to go with a basic school girl/stripper concept with lots of fishnet, fake fur and jewelry. The only part of the costume that was difficult to build was the hat. To make the fur required a lot of prims. I'll have to look at the object's prim count one day, but I suspect there are close to 300 prims in the hat alone.

Leslie's Tartan


This was the first set of clothing I ever made in Second Life. The only thing even remotely special is that the Sunglasses are actually part of the hair attachment. The root prim is the bridge of the glasses, combining the two attachments freed up an extra attachment point for jewelry (like a nose ring or lip ring).

Before I reopen Nishi's I may go back and script the glasses so you can select what color rims/lenses you want in them.

Leslie's Party Dress


I put this ensemble together just after I finished the Leslie's Tartan set. Female avatars are supposed to have a black dress right?

This was really simple to build. I just repainted the textures and hair from the previous outfit and added in a variation of the corset from the tartan.

FFX2 Yuna - Gunner


The Final Fantasy X2 outfits were exceptionally difficult to reproduce. The level of detail in them took a great deal of time to reproduce. There were also a tremendous amount of textures that I had to build to capture all of the detail.

I've seen a lot of variations of this outfit in Second Life, and I honestly think this is the most accurate rendition of the Yuna Gunner Dresssphere Costume in the simulation. The most problematic detail in the whole costume was that Yuna's character has different colored eyes. I had to texture a blue and green eyeball then, map that onto a hollow half-sphere prim and attach them to the avatar eyeballs. That was tedious work.

I want to do Yuna's Dark Knight Dressphere Costume as well, but that is going to a take a while to build. I don't even want to think about the number of prims it will take to make that suit of armor.

FFX2 Rikku - Thief


This was a rather fun, but frustrating FFX2 costume to reproduce. I had to build the swirled-pupil eyes of the Al Behd, but I was able to texture map them onto the eyeballs because both eyes were the same.

The difficult part of this costume was recreating all of the flexible fabric in it. The skirt, bows on the arms and scarf are all flexible. It took a lot of meddling with each prim's gravity to get the outfit to flow realistically when the avatar moves.

The hair was a real pain in the ass to build because Rikku had so many braids and colored beads. Not to mention the scarf wrapped around her head. This costume is accurate from her head to her shoes. The only thing I couldn't duplicate was flexible hair braids. When I built the outfit, Second Life didn't have the capability to attach a solid prim to a flexi prim and have them move in concert.

This is one of my more favorite costumes.

Abby's Fishnet


I like to watch NCIS, so I decided to do a line of gothic clothing and name it Abby, after the character on the show. The outfit has a lot of fishnet, studded bands and barbed wire. A perfect outfit for a night in the mosh pit.

Abby Gothic


This is a pretty racy costume. I based it on some photos of Bianca Beauchamp, left, (official website), then took a lot of liberty with the whole latex concept. There's a lot of transparency in the shirt and skirt. The costume uses the actual skirt mesh from Second Life, but I added the transparency with textured TARGA files. The skirt is as short as I could make it and still have it look like a skirt.

This is the second costume in the Abby line, inspired by Abby on NCIS.

The costume also contains a tremendous number of prims in the attachments as well as flexi prims in the armbands. The boots are similar to the ones from Abby's fishnet, but they have more studs.

This is also the first scripted costume I designed to sell. All of the attached objects have a "Bling Script" embedded in them. If you're not familiar with Second Life, Bling Scripts make the prims sporadically emit a brief starburst, like a light source reflecting off gold or silver.

I also included an earring that has an animation override script in it. The AO override script, prevents the avatar from using the default "at rest" pose and instead cycles through five other model-stance poses.

I think this is my best designed outfit, but still it's not my favorite.

Nishi's Unlimited


One of my Second Life avatars, Aireanna Nishi, once ran a clothing store in Second Life called Nishi's Unlimited. Due to the fact I've been extremely busy in 2008, I closed Nishi's Unlimited in January. The screenshot above is from the shop I was running in Dakari Coast Estates at the time. I still get occasional messages from people that purchased clothes from me, so I may reopen the store this fall.

Check this page in September or October of 2008 if you are interested in purchasing any of these clothes. You can also usually find my avatar in the Sand Box at Ed Tech or at Abbott's Aerodrome. I love virtual skydiving.

Second Life Clothing

Ever since The Sims came out, I've been fascinated with skinning character models. So, from time-to-time, I skin clothing for avatars in Second Life. At one point I opened a clothing shop, Nishi's Unlimited, but got too busy to keep it running in the simulation.

I decided to post some advertising shots from the shop for each set of clothing I designed. Over the Fourth of July weekend, I got the urge to work on some new outfits. I plan reopen Nishi's in the fall when I'm not so busy in real life.

Products Available will be:
Abby Gothic
Abby's Fishnet
FFX2 Rikku - Thief
FFX2 Yuna - Gunner
Leslie's Party Dress
Leslie's Tartan
Modern Witch
Naughty Nurse
NFL: (Houston, Jacksonville, Tampa Bay)
Nishi's Racing Modelwear 001
Super Hero Girl - Stilletto